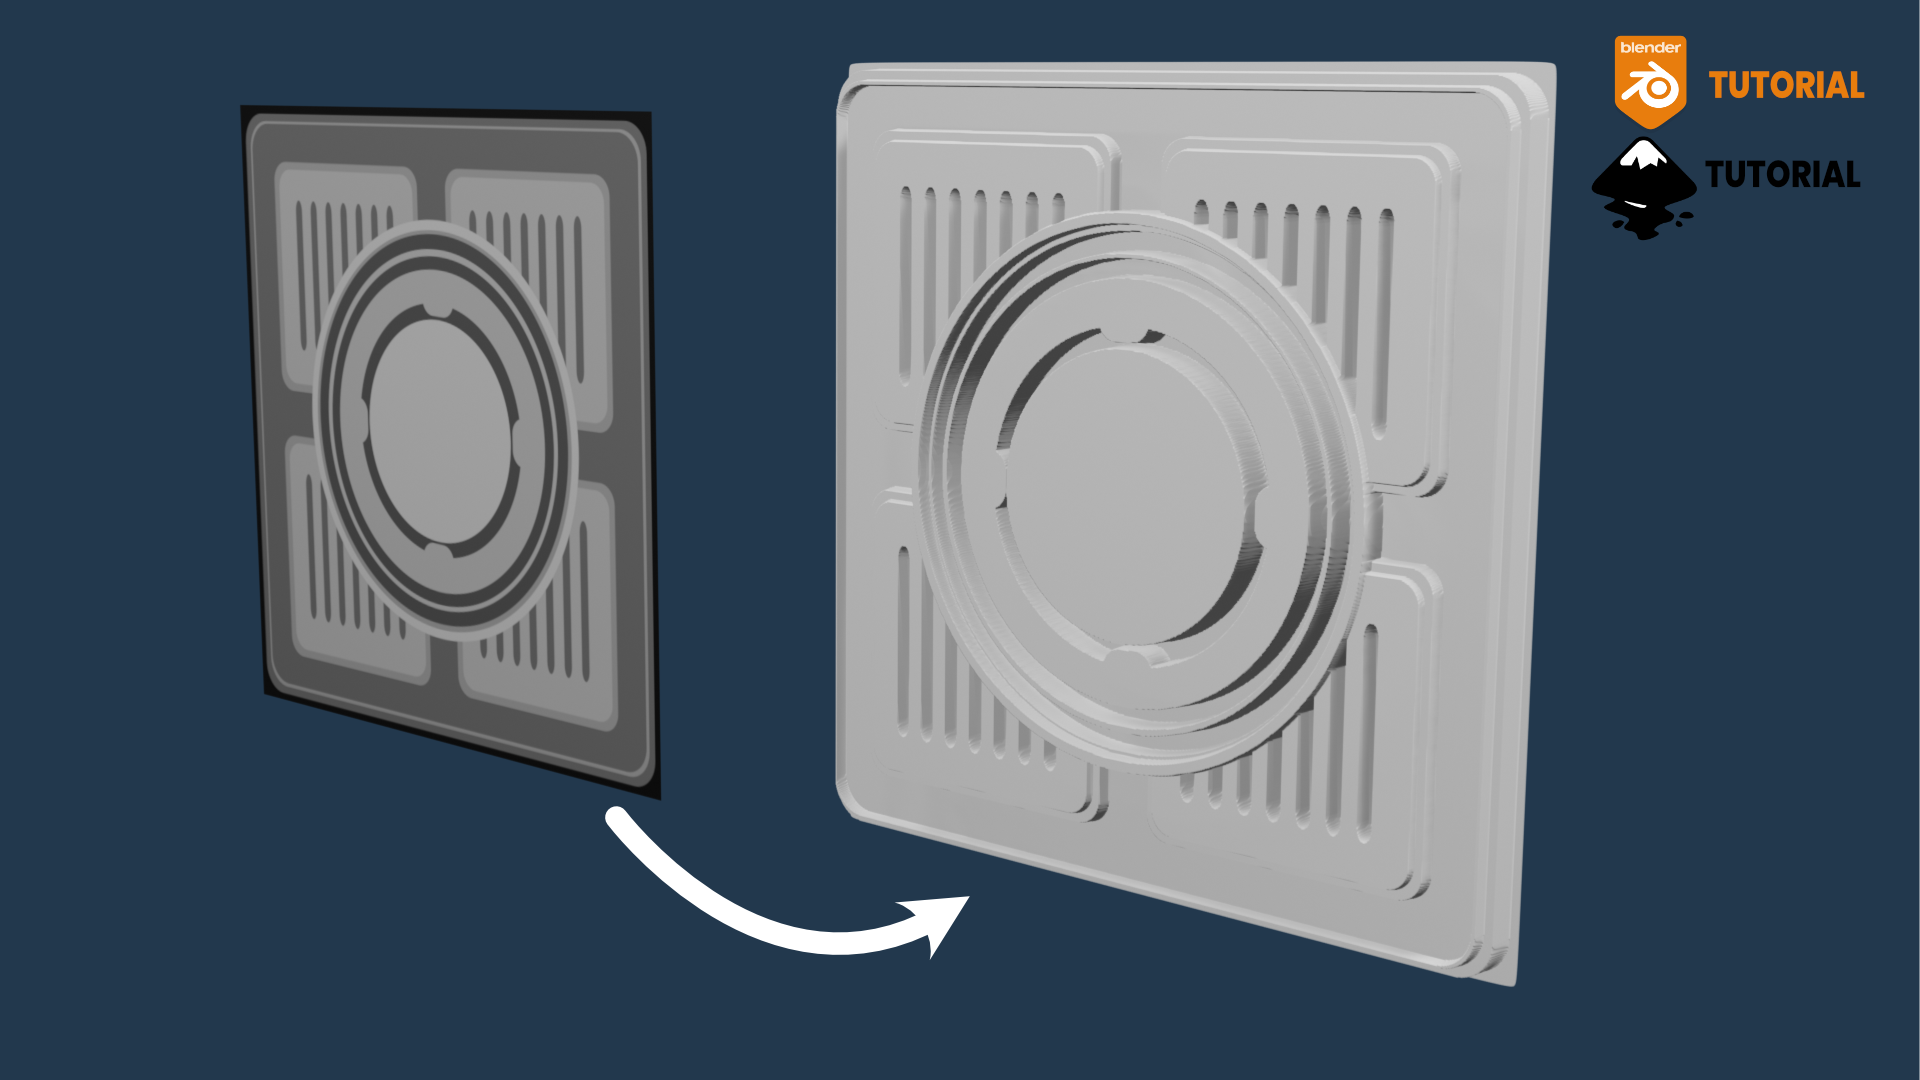
In this tutorial, I will show you how to use Inkscape to make sculpting alphas for your project.
Inkscape
I will be using Inkscape but you can use any software you have access to – such as Photoshop, GIMP, or Affinity Designer
I right-click on the document and change the scale to 1000px x 1000px
I pull out horizontal and vertical guides to 500px
Background
I use the rectangle tool and make a 1000px x 1000px square and fill it with a black color
I will then lock this layer so I don’t accidently select it
We need this to be black so it will act as a neutral height for the mask
Remember that the darker the color the closer to neutral or slightly raised it will be or if you use the inverse and dig into the mesh when you are sculpting, the darker the color, the more it will dig into the mesh
This will make more sense when we use this on a mesh
Make sure that whatever you add does not touch the edges of the black square or you will have an ugly square surrounding your alpha when you use it on a mesh
Rectangle Fill
I make a new rectangle that is 975px and center it on the document
I fill the rectangle with 60% gray
I round the corners using the node tool
Rectangle Stroke
I use CTRL + D to duplicate the square
I decrease the scale to 950px and center it
I fill it with a 40% gray
I use CTRL + D to duplicate the square
I decrease the scale to 940px and center it
I fill it with a red color so I can see it
I select these two squares and under the path menu, I choose “difference” to cut out the interior of the rectangle
Circle Fill
I use the ellipse tool and make a circle that is 330px
*Note: Holding down SHIFT + CTRL will allow you to make a proportional square or circle
I make sure it is centered according to the guides
I fill it with a 20% gray
Square – Small
I add a second smaller square [375]
I fill this square with 40% gray and use the node tool to round out the corners
I use CTRL + D to duplicate the square and scale it down [350]
I then center it within the bottom square
I fill this square with 30% gray
I select both squares and use CTRL + G to group them
I move the group so it is 30px away from the stroke I made earlier
I make a long, skinny rectangle filled with 60% gray
I make seven copies and space them evenly
I then group them and center then on top of the lighter small square
Square – Small Duplicates
I group and duplicate the group and move it to the left-side
I duplicate both of these groups and move them to the bottom
I select all four groups and group them together
I move this layer below the circle
Circle Stroke – Outer
I duplicate the circle and decrease the size to 630px
I center the new circle and fill it with a 40% gray
I then select the stroke option and holding down the SHIFT key, I select the 40% gray
I then clear the fill
I change the width of the stroke to 25px
I change the scale back to 630px and center it
Circle Stroke – Center
I duplicate the circle and decrease the size to 615px
I center the new circle and fill it with a 30% gray
I then select the stroke option and holding down the SHIFT key, I select the 40% gray
Circle Stroke – Inner
I duplicate the circle and decrease the size to 550px
I center the new circle
Circle – Inner
I duplicate the large circle and change the size to 400px
I fill it with a 70% gray and center it
I duplicate this circle and change the size to 350px
I fill it with a 20% gray and center it
I add a rectangle that is 50px x 75px
I change the color to red so I can easily see it
I center it over the 70% filled center circle
I use the node tool to turn the rectangle into a capsule shape
I duplicate the rectangle and move it to the left-side
I select both rectangles and group them
I duplicate both rectangles
I click on the duplicate a second time and rotate them 90-degrees
I then group all of the rectangles into one group
I select each rectangle individually and also select the 70% filled circle
Under the path menu, I choose “difference”
I export this alpha as a PNG (you can also use a JPG)
Blender
In Blender, I already have a plane that has been subdivided
Under the Texture panel, I add a new texture and open the Texture tab
In the Texture tab, I open the alpha I just made
Back on the Brushes tab, under the Falloff panel, I change the falloff type to constant
I change the Mapping option to “Stencil”
I use the RMB to move the stencil
I use SHIFT + RMB to scale the stencil
CTRL + RMB will allow you to rotate the stencil
I make sure my brush size is larger than the stencil
I can now Left-Click to apply my stencil
How to make sculpting alphas in Inkscape for use in Blender
- Blender Versions: 3.6 LTS
- Price type: Free
- Tags:tutorialsculpting3dmodeling